🔢 Single-Digit 7-Segment Display Counter with Raspberry Pi Pico

🔢 Single-Digit 7-Segment Display Counter with Raspberry Pi Pico

A beginner-friendly electronics project for students


🧠 What You’ll Learn

  • What a 7-segment display is
  • How to control it using Raspberry Pi Pico
  • How to display numbers from 0 to 9
  • How to write and run MicroPython code
  • Basic GPIO and coding skills

🧰 Materials Required

ItemQuantity
Raspberry Pi Pico1
Breadboard1
7-Segment Common Cathode Display1
Jumper Wires10+
Resistors (220Ω recommended)8
USB Cable for Pico1
Computer with Thonny IDE1

🔎 What is a 7-Segment Display?

A 7-segment display is an electronic component made up of 7 LEDs arranged to form digits. Each segment is labeled a–g, and an optional dot (dp) can be used too.

There are two types:

  • Common Cathode (CC): All LEDs share ground, and a segment turns ON with a HIGH signal (1).
  • Common Anode (CA): All LEDs share VCC, and a segment turns ON with a LOW signal (0).

👉 In this project, we’re using a Common Cathode display.
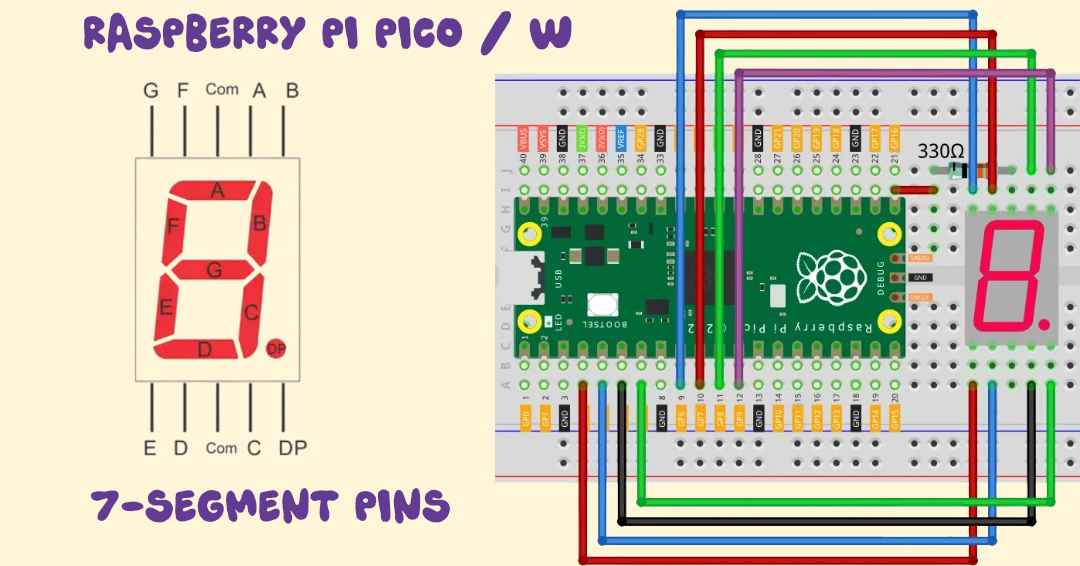

🔌 Wiring Diagram

Here’s how you connect the Pico to the 7-segment display:

SegmentGPIO Pin (Pico)
aGP0
bGP1
cGP2
dGP3
eGP4
fGP5
gGP6
dpGP7
COMGND

ℹ️ Use resistors (220Ω) between each GPIO and segment pin to limit current and protect your board.

🔢 Single-Digit 7-Segment Display Counter with Raspberry Pi Pico

💻 MicroPython Code (Single-Digit Counter)

Open Thonny IDE, connect your Pico, and paste this code:

pythonCopyEditfrom machine import Pin
import utime

# Segment pins a to dp connected to GPIO0–7
segment_pins = [0, 1, 2, 3, 4, 5, 6, 7]
segments = [Pin(pin, Pin.OUT) for pin in segment_pins]

# Digit segment patterns (Common Cathode)
digit_patterns = [
    (1, 1, 1, 1, 1, 1, 0, 0),  # 0
    (0, 1, 1, 0, 0, 0, 0, 0),  # 1
    (1, 1, 0, 1, 1, 0, 1, 0),  # 2
    (1, 1, 1, 1, 0, 0, 1, 0),  # 3
    (0, 1, 1, 0, 0, 1, 1, 0),  # 4
    (1, 0, 1, 1, 0, 1, 1, 0),  # 5
    (1, 0, 1, 1, 1, 1, 1, 0),  # 6
    (1, 1, 1, 0, 0, 0, 0, 0),  # 7
    (1, 1, 1, 1, 1, 1, 1, 0),  # 8
    (1, 1, 1, 1, 0, 1, 1, 0)   # 9
]

# Display a number 0–9
def display_number(num):
    pattern = digit_patterns[num]
    for seg, val in zip(segments, pattern):
        seg.value(val)

# Count from 0 to 9 with 1-second delay
while True:
    for num in range(10):
        display_number(num)
        utime.sleep(1)

🔍 Code Explanation

LineWhat It Does
segment_pinsMaps each segment (a–dp) to GPIO 0–7
digit_patternsStores ON/OFF state for each segment per digit
display_number(num)Lights up segments to show the given number
while True:Keeps looping forever
for num in range(10)Counts from 0 to 9
utime.sleep(1)Waits 1 second before showing the next digit

TIPS:

segments = [Pin(pin, Pin.OUT) for pin in segment_pins]

🔁 What it actually means in full:

segments = [
Pin(0, Pin.OUT), # For segment 'a'
Pin(1, Pin.OUT), # For segment 'b'
Pin(2, Pin.OUT), # For segment 'c'
Pin(3, Pin.OUT), # For segment 'd'
Pin(4, Pin.OUT), # For segment 'e'
Pin(5, Pin.OUT), # For segment 'f'
Pin(6, Pin.OUT), # For segment 'g'
Pin(7, Pin.OUT) # For decimal point 'dp'
]

This version uses a list comprehension, which saves space and is good for larger displays or flexible pin setups.

class Pin – control I/O pins

from machine import Pin

# create an output pin on pin #0
p0 = Pin(0, Pin.OUT)

# set the value low then high
p0.value(0)
p0.value(1)

# create an input pin on pin #2, with a pull up resistor
p2 = Pin(2, Pin.IN, Pin.PULL_UP)

# read and print the pin value
print(p2.value())

# reconfigure pin #0 in input mode with a pull down resistor
p0.init(p0.IN, p0.PULL_DOWN)

Here, we are doing similar for function : def display_number(num)

def display_number(num):
pattern = digit_patterns[num]
for seg, val in zip(segments, pattern):
seg.value(val)

say example: num=3; num is a parameter — the digit (from 0 to 9) you want to show on the display

display_number(3)
pattern=digit_patterns[3] = (1, 1, 1, 1, 0, 0, 1, 0) # one list pattern
segments = [Pin(0, Pin.OUT), Pin(1, Pin.OUT), ..., Pin(7, Pin.OUT)] # 2nd list segments

zip

zip(segments, pattern)

This gives you pairs like this:

segval
Pin(0, Pin.OUT)1
Pin(1, Pin.OUT)1
Pin(2, Pin.OUT)1
Pin(3, Pin.OUT)1
Pin(4, Pin.OUT)0
Pin(5, Pin.OUT)0
Pin(6, Pin.OUT)1
Pin(7, Pin.OUT)0
for seg, val in zip(segments, pattern):
seg.value(val)
Alternatively:
for i in range(len(segments)):
segments[i].value(pattern[i])

The for loop goes through both lists together

🧠 Given:

pattern = (1, 1, 1, 1, 0, 0, 1, 0)

segments = [
Pin(0, Pin.OUT),
Pin(1, Pin.OUT),
Pin(2, Pin.OUT),
Pin(3, Pin.OUT),
Pin(4, Pin.OUT),
Pin(5, Pin.OUT),
Pin(6, Pin.OUT),
Pin(7, Pin.OUT)
]

✅ The expanded version of seg.value(val):

segments[0].value(1)  # Turn ON Pin 0
segments[1].value(1) # Turn ON Pin 1
segments[2].value(1) # Turn ON Pin 2
segments[3].value(1) # Turn ON Pin 3
segments[4].value(0) # Turn OFF Pin 4
segments[5].value(0) # Turn OFF Pin 5
segments[6].value(1) # Turn ON Pin 6
segments[7].value(0) # Turn OFF Pin 7

✨ So,

The line seg.value(val) is just a short and smart way to run all these .value() commands one by one for each segment.

🧪 Try This

  • Change utime.sleep(1) to 0.5 to make it faster.
  • Modify the segment patterns to show letters like A, b, C, E, F.
  • Add a push-button to control the number manually.

🧰 Troubleshooting Tips

ProblemSolution
Segments not lightingCheck wiring and pin numbers
Wrong number showingDouble-check your segment order and patterns
Display too dimTry powering Pico from USB or use lower resistors

🎯 Conclusion

This single-digit counter project is a great introduction to microcontrollers, digital displays, and MicroPython programming. Once you’re confident, you can expand this into:
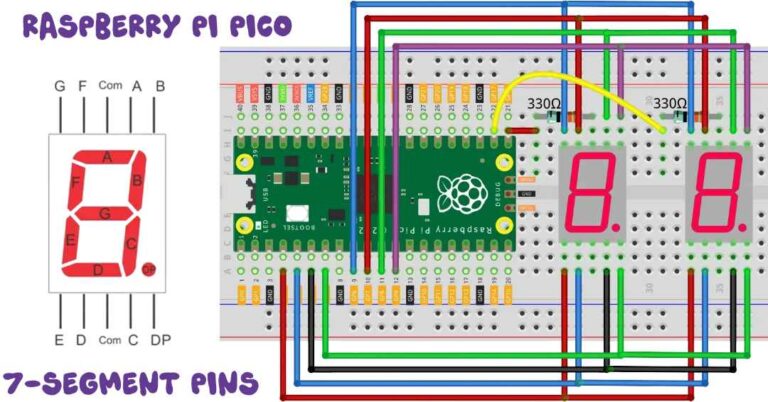
  • A 2-digit stopwatch
  • A countdown timer
  • A score display for games

Similar Posts

Leave a Reply

Your email address will not be published. Required fields are marked *