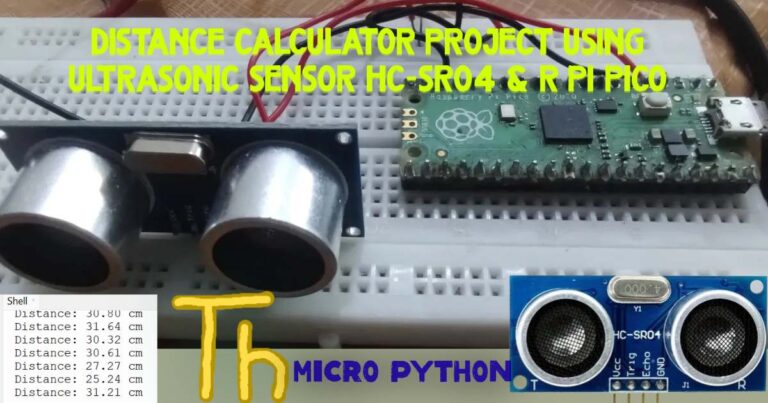
2-Digit 7-Segment Counter Using Raspberry Pi Pico with Buttons and Buzzer
Ever wanted your project to go tik-tik as it counts? In this fun electronics project, we’ll build a 2-digit up/down auto counter using a Raspberry Pi Pico, two 7-segment displays, buttons for control, and even a buzzer that beeps with every count!
Perfect for school students, beginners, or hobbyists exploring MicroPython, displays, and sound.
🎯 What You’ll Learn
✅ Interface 7-segment displays
✅ Use buttons to control GPIO inputs
✅ Use a buzzer to generate tik-tik sounds
✅ Control timing and logic in MicroPython
✅ Understand multiplexing and PWM
A running auto-counter — meaning:
✅ Press Start-Up → it starts counting automatically every second
✅ Press Start-Down → it counts down every second
✅ Press Stop → it pauses
✅ Press Reset → goes back to00
🧠 How It Works:
| Feature | What It Does |
|---|---|
mode = "up" | Starts incrementing counter automatically every second |
mode = "down" | Starts decrementing every second |
mode = None | Pauses (used in Stop or Reset) |
utime.ticks_diff() | Waits 1000ms (1 sec) before next update |
display_digit(...) | Uses multiplexing to show both digits smoothly |
🧰 Components Needed
| Component | Quantity |
|---|---|
| Raspberry Pi Pico | 1 |
| 7-Segment Display (Common Cathode) | 2 |
| Push Buttons | 4 |
| Passive Buzzer | 1 |
| 220Ω resistors (for segments/buzzer) | As needed |
| Jumper Wires + Breadboard | 1 set |
📌 Button Functions
| Button | Action | GPIO |
|---|---|---|
| Start Up | Auto count upward | GP10 |
| Start Down | Auto count downward | GP11 |
| Reset | Set counter to 00 | GP12 |
| Stop | Pause counter | GP13 |
🔌 Buzzer Connection
| Buzzer Pin | Connect To |
|---|---|
| + | GP15 (via 220Ω) |
| – | GND |
We’re using a passive buzzer so we can control the frequency for different tones.
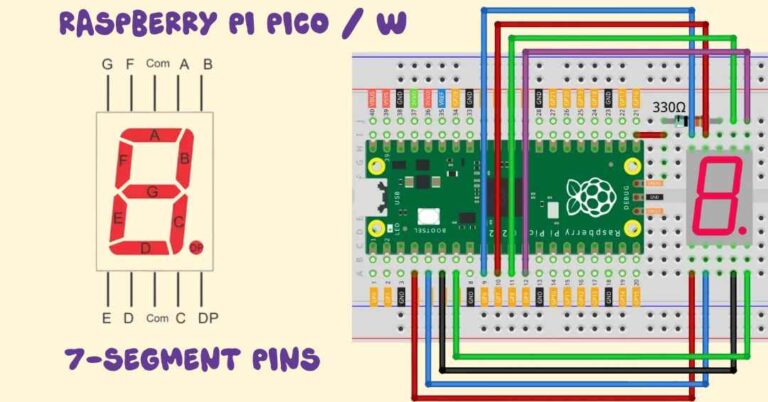
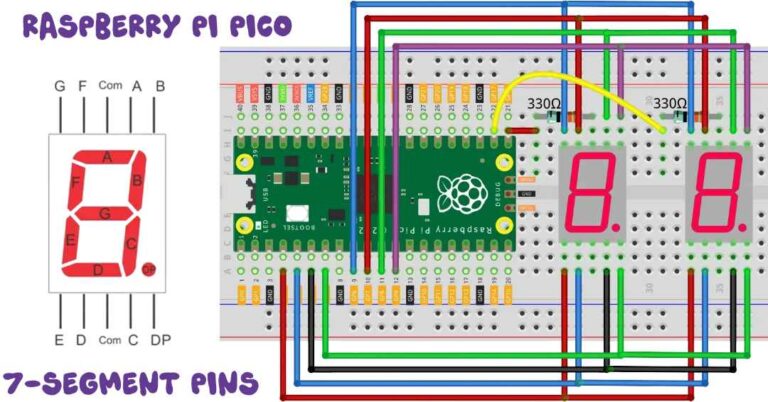
🔢 Segment to GPIO Pin Mapping
Connect segment a to dp of both 7-segment displays to:
a  → GP0
b  → GP1
c  → GP2
d  → GP3
e  → GP4
f  → GP5
g  → GP6
dp → GP7
Common cathode pins of:
- Left display → GP16
- Right display → GP17
💻 Full MicroPython Code
from machine import Pin, PWM
import utime

# Segment pins a to dp (GPIO0 to GPIO7)
segment_pins = [0, 1, 2, 3, 4, 5, 6, 7]
segments = [Pin(pin, Pin.OUT) for pin in segment_pins]

# Digit control pins (common cathode control)
digit_pins = [Pin(16, Pin.OUT), Pin(17, Pin.OUT)]

# Buzzer using PWM (GPIO15)
buzzer = PWM(Pin(15))

# Buttons connected to GPIOs with internal pull-downs
btn_up = Pin(10, Pin.IN, Pin.PULL_DOWN)
btn_down = Pin(11, Pin.IN, Pin.PULL_DOWN)
btn_reset = Pin(12, Pin.IN, Pin.PULL_DOWN)
btn_stop = Pin(13, Pin.IN, Pin.PULL_DOWN)

# 7-segment digit patterns for 0-9 (common cathode)
digit_patterns = [
    (1,1,1,1,1,1,0,0),  # 0
    (0,1,1,0,0,0,0,0),  # 1
    (1,1,0,1,1,0,1,0),  # 2
    (1,1,1,1,0,0,1,0),  # 3
    (0,1,1,0,0,1,1,0),  # 4
    (1,0,1,1,0,1,1,0),  # 5
    (1,0,1,1,1,1,1,0),  # 6
    (1,1,1,0,0,0,0,0),  # 7
    (1,1,1,1,1,1,1,0),  # 8
    (1,1,1,1,0,1,1,0)   # 9
]

# Initialize counter and mode
counter = 0
mode = None  # 'up', 'down', or None (paused)
last_tick = utime.ticks_ms()

# -------- Buzzer Beep Functions -------- #
def beep_up():
    buzzer.freq(1000)
    buzzer.duty_u16(1000)
    utime.sleep(0.05)
    buzzer.duty_u16(0)

def beep_down():
    buzzer.freq(400)
    buzzer.duty_u16(1000)
    utime.sleep(0.1)
    buzzer.duty_u16(0)

# -------- Display Function -------- #
def display_digit(pos, digit):
    pattern = digit_patterns[digit]
    for seg, val in zip(segments, pattern):
        seg.value(val)

    # Activate only one digit at a time
    digit_pins[0].value(1)
    digit_pins[1].value(1)
    digit_pins[pos].value(0)
    utime.sleep_ms(5)
    digit_pins[pos].value(1)

# -------- Main Loop -------- #
while True:
    # ---- BUTTONS ---- #
    if btn_up.value():
        mode = "up"
        utime.sleep(0.3)

    if btn_down.value():
        mode = "down"
        utime.sleep(0.3)

    if btn_reset.value():
        counter = 0
        mode = None
        utime.sleep(0.3)

    if btn_stop.value():
        mode = None
        utime.sleep(0.3)

    # ---- COUNTING (every 1s) ---- #
    if mode and utime.ticks_diff(utime.ticks_ms(), last_tick) >= 1000:
        if mode == "up" and counter < 99:
            counter += 1
            beep_up()
        elif mode == "down" and counter > 0:
            counter -= 1
            beep_down()
        last_tick = utime.ticks_ms()

    # ---- SPLIT COUNTER INTO DIGITS ---- #
    tens = counter // 10
    ones = counter % 10

    # ---- DISPLAY BOTH DIGITS ---- #
    for _ in range(10):  # Repeat to reduce flickering
        display_digit(0, tens)
        display_digit(1, ones)
🔊 How the Sound Works
| Action | Sound Type | Frequency |
|---|---|---|
| Count Up | Short beep | 1000 Hz |
| Count Down | Lower tone | 400 Hz |
| Reset/Stop | (You can add more if needed) |
You can even add unique beep patterns if you like!
🧠 Why Use _?
Normally, in a loop like this:
for i in range(10):
    print(i)
The variable i holds values from 0 to 9.
But in your case, you’re not using that loop variable at all — you’re just repeating something 10 times.
So instead of writing:
for i in range(10):
    display_digit(0, tens)
    display_digit(1, ones)
…and having i sit there unused, we write:
for _ in range(10):
    display_digit(0, tens)
    display_digit(1, ones)
This tells readers (and Python) clearly:
“We’re just looping for repetition. We don’t need the counter.”
✅ Summary
| Syntax | Meaning |
|---|---|
for i in range(10) | Use i if you need the loop index |
for _ in range(10) | Use _ if you don’t care about the index |
It’s a clean, readable, and recommended practice in Python when you don’t need the loop variable.
🔁 If counter = 47
We split it:
tens = 4ones = 7
Now, this line runs:
for _ in range(10):
    display_digit(0, tens)   # Show 4 on first display
    display_digit(1, ones)   # Show 7 on second display
🧠 What Happens in display_digit()?
Let’s assume utime.sleep_ms(5) is used:
Loop iteration #1:
- Display 1 ON: Show
4for 5 milliseconds - Display 2 ON: Show
7for 5 milliseconds
Loop iteration #2:
- Repeat the same:
4on digit 1 → 5ms7on digit 2 → 5ms
… and this is done 10 times total:
🧮 10 × (5ms + 5ms) = 100ms
So you’re refreshing the entire display 10 times in 100 milliseconds, which is fast enough that:
- The human eye sees both digits as being constantly ON
- No flicker is noticed
- Both digits appear to light up simultaneously, even though only one is ON at a time
💡 Why This Works
Your eyes can’t notice flicker if the screen is refreshed faster than about 60 times per second (60Hz or ~16ms per frame).
This code is refreshing it much faster (~100Hz), so both digits look perfectly stable.
✅ Summary
| Step | Duration |
|---|---|
Show 4 on digit 1 | 5 ms |
Show 7 on digit 2 | 5 ms |
| Repeat above steps 10× | Total ≈ 100 ms |
🔁 And this cycle keeps running forever, so it looks like both digits are always glowing.
✅ Wiring Your Button with Pin.PULL_DOWN
Since your MicroPython code uses:
button_up = Pin(10, Pin.IN, Pin.PULL_DOWN)
That means:
- The GPIO pin (GP10) will read 0 (LOW) when the button is not pressed.
- When you press the button, you want it to connect to 3.3V, making it HIGH (1).
✅ So your button wiring should be:
| Button Pin | Connects To |
|---|---|
| One side | 3.3V (Pin 36 on Pico) ✅ |
| Other side | GPIO10 (button input pin) ✅ |
📌 No external resistor is needed because you’re using the internal pull-down resistor.
🔁 What Happens:
- Button not pressed:
GPIO10 is pulled LOW (0) by the internal pull-down. - Button pressed:
3.3V flows into GPIO10 → reads HIGH (1) → your code detects button press.
⚠️ Don’t do this:
- ❌ Don’t connect one side to GND and the other to GPIO10 when using
Pin.PULL_DOWN, because that would never go HIGH. - ❌ Don’t connect 3.3V directly to GPIO10 without a button — you must go through the button!
✅ Conclusion
Your setup:
One pin of button to 3.3V (Pin 36)
Other pin to GPIO10
✔️ Correct!
Main Program Loop
while True:
This loop keeps checking buttons and refreshing the display.
🧠 Code Explained in Simple Terms
🧱 1. Import necessary modules
pythonCopyEditfrom machine import Pin, PWM
import utime
machine: lets you control Pico’s hardware (GPIO, PWM, etc.).Pin: controls GPIO pins.PWM: controls the buzzer (to create tones).utime: for delays, timers, etc.
💡 2. 7-Segment display setup
pythonCopyEditsegment_pins = [0, 1, 2, 3, 4, 5, 6, 7]
segments = [Pin(pin, Pin.OUT) for pin in segment_pins]
- These GPIO pins are connected to segments a to dp of the 7-segment displays.
- Each segment is set as an output pin.
pythonCopyEditdigit_pins = [Pin(16, Pin.OUT), Pin(17, Pin.OUT)]
- These two pins control which digit to light up (common cathode).
- One is for the tens digit, the other for the ones digit.
🔊 3. Buzzer setup
pythonCopyEditbuzzer = PWM(Pin(15))
- Buzzer is connected to GPIO15 and controlled using PWM to make different sounds.
🎮 4. Button setup
pythonCopyEditbtn_up = Pin(10, Pin.IN, Pin.PULL_DOWN)
btn_down = Pin(11, Pin.IN, Pin.PULL_DOWN)
btn_reset = Pin(12, Pin.IN, Pin.PULL_DOWN)
btn_stop = Pin(13, Pin.IN, Pin.PULL_DOWN)
- Four buttons:
- UP ➜ count up
- DOWN ➜ count down
- RESET ➜ set counter to 0 and stop
- STOP ➜ pause the counter
- Each is connected with an internal pull-down resistor, so it reads
0by default.
🔢 5. Digit patterns for displaying 0–9
pythonCopyEditdigit_patterns = [
    (1,1,1,1,1,1,0,0),  # 0
    (0,1,1,0,0,0,0,0),  # 1
    ...
    (1,1,1,1,0,1,1,0)   # 9
]
- Each tuple controls the 8 segments (a to dp) of the display.
- For example,
1means ON (segment glows),0means OFF.
🔄 6. Counter setup
pythonCopyEditcounter = 0
mode = None
last_tick = utime.ticks_ms()
counter: stores the current number (0 to 99)mode:"up","down", orNone(pause)last_tick: stores the last time we counted 1 second
🎵 7. Beep sound functions
pythonCopyEditdef beep_up():
    buzzer.freq(1000)
    buzzer.duty_u16(1000)
    utime.sleep(0.05)
    buzzer.duty_u16(0)
- Makes a high-pitch beep for UP counting.
pythonCopyEditdef beep_down():
    buzzer.freq(400)
    buzzer.duty_u16(1000)
    utime.sleep(0.1)
    buzzer.duty_u16(0)
- Makes a lower-pitch beep for DOWN counting.
🔢 8. Display a single digit on a 7-segment
pythonCopyEditdef display_digit(pos, digit):
    pattern = digit_patterns[digit]
    for seg, val in zip(segments, pattern):
        seg.value(val)

    digit_pins[0].value(1)
    digit_pins[1].value(1)
    digit_pins[pos].value(0)
    utime.sleep_ms(5)
    digit_pins[pos].value(1)
pos: 0 = tens, 1 = ones.- Lights up segments for that digit using the pattern.
- Activates the right display by pulling its pin LOW (common cathode).
- Then waits 5 ms and turns it off again.
- This is done repeatedly (many times per second) to create the illusion of both digits showing at once (called multiplexing).
🔁 9. Main loop
pythonCopyEditwhile True:
Runs forever.
🟢 Detect button presses
pythonCopyEditif btn_up.value():
    mode = "up"
    utime.sleep(0.3)
- If UP button is pressed, set mode to
"up", so counter starts increasing.
pythonCopyEditif btn_down.value():
    mode = "down"
    utime.sleep(0.3)
- DOWN mode activated.
pythonCopyEditif btn_reset.value():
    counter = 0
    mode = None
    utime.sleep(0.3)
- RESET ➜ counter goes back to
0and stops.
pythonCopyEditif btn_stop.value():
    mode = None
    utime.sleep(0.3)
- STOP ➜ pauses counting.
⏱ Update counter every 1 second
pythonCopyEditif mode and utime.ticks_diff(utime.ticks_ms(), last_tick) >= 1000:
- Only update if a mode is active and 1 second has passed.
pythonCopyEditif mode == "up" and counter < 99:
    counter += 1
    beep_up()
- Increase counter and beep, only up to 99
pythonCopyEditelif mode == "down" and counter > 0:
    counter -= 1
    beep_down()
- Decrease counter and beep, only down to 0
pythonCopyEditlast_tick = utime.ticks_ms()
- Reset the tick timer.
🔢 Split digits and display
pythonCopyEdittens = counter // 10
ones = counter % 10

for _ in range(10):
    display_digit(0, tens)
    display_digit(1, ones)
- Break the counter into tens and ones digits.
- Show each digit rapidly and repeatedly to make the display appear steady.
✅ Summary
This program turns your Raspberry Pi Pico into a 2-digit timer with:
- Two 7-segment displays
- Control using buttons (UP, DOWN, RESET, STOP)
- Beep feedback for user interaction
- Multiplexing for clean display
🧪 Try These Experiments
- Add a buzzer beep when Reset is pressed.
- Add auto stop at 99 or 0.
- Use an OLED display instead of 7-segment.
- Add LEDs for each button press.